
Tutorial: How to engrave recessed panel lines

In this post, I will share my approach on how to engrave recessed panel lines with this step-by-step tutorial. Typically, this technique will be applicable to kits featuring raised panel lines (usually older tooled kits), but also missing and / or misplaced panel lines.
Today’s candidate is a copy of Monogram’s Kingfisher. The original moulds date back to the 60ies, where panel lines were engraved into the moulds, hence producing raised lines on the plastic parts.

I will re-scribe all panel lines and eventually add new ones on the usual areas: wings, fuselage, horizontal stabilizers and floats. For other objects, the areas can be extended to landing gear covers and other peripheral parts.
Required Tools
A scriber with appropriate engraving blades. I consider Tamiya’s offering to be the best available product, as it will produce crisp and sharp lines. As alternative, you could also use a good old-school engraving needle, but handling is a bit more difficult, and more cleaning work on the plastic will be necessary. The higher cost for the Tamiya tool is thus a good investment.

Tamiya scriber with engraving blades and drill set A fine marker pen that can be used on plastic. You will need it to mark the start and end points of the lines, and eventually some lines or hatch locations on the bare plastic – the finer the marker, the better.
Dymo labelling tape (or similar). This will be used for long and straight lines. You want this tape to be self-adhesive, rather rigid and of a certain strength, as its edge will be used as a leading line for the engraving blade.
Regular masking tape. It will be used for spot marcation, but also as a base for the Dymo tape. This will allow you to remove the Dymo tape more easily, and you can re-use it a few times. I use the regular yellow Tamiya masking tape.
Flexible masking tape. This will be used for curved lines, especially vertical lines on the fuselage. Again, the Tamiya product is my weapon of choice here, as its edge is just high enough to provide a good leading line for the blade.

Flexible tape, Dymo tape and regular masking tape Sanding sticks or sponges with different grains (from 240 to 1000 will cover all scenarios) and sanding paper. I work with the Vallejo set, but this is really a matter of personal taste and whatever works best for you.

Sanding gear and fine marking pen
Optional Tools
Photo Etch templates in various sizes and shapes for recreating hatches, fuel caps, etc. Eduard provides a good selection, depending on your needs.

PE Templates for hatches etc. A drill set with fine diameter for holes larger than rivets. Tamiya offers a very useful fine drill set from 0,3 to 0,8 mm.
If you fancy rivets, you may consider a rivet maker. I use the Trumpeter sets, they are affordable and come with different rivet shapes, including double row rivets.
Documentation is always a helpful asset. In this case, you may want to use technical drawings, ideally scaled to 1/48 and printed to paper, as templates with which you can identify the exact locations of what you want to engrave. As alternative approach, you can stick to the kit’s raised panel lines as an orientation and remove them one by one, engraving the plastic on their initial location.

Scaled technical drawing. Some missing lines and hatches can be seen on the kit part. Source: Warpaint Series No. 111 by Kev Darling, Guidelines Publications
Step 1: Sand off raised panel lines
Depending on how you will recreate the pattern, you have 2 options:
Working with templates: Remove all raised lines and send the entire area smooth. Determine the locations to engrave with the templates.
Working without templates: Remove the raised lines one by one. Mark start and end point of the line before sanding it off, and connect these 2 points with masking tape. Engrave this line before proceeding to the next one.
When sanding, remove the raised lines with rough grain and re-sand with the finer grains until the surface is smooth.
I did keep the raised lines on the fabric covered flaps.


Step 2: Marking the panel lines
Determine start and end point of the panel line and connect the 2 spots with regular masking tape. Work slowly and accurately, as this step will have a lot of impact on the final result.
Extend the masking tape beyond the start and end points, but make sure to also mark the line length (e.g. by placing a piece of masking tape in a right angle at the end points).
Next, place the Dymo Tape onto the masking tape. Again, extend the line beyond the end points. Make sure that the edges of the two tapes are perfectly aligned on the engraving line.

The first panel line to be engraved has been marked with Tamiya and Dymo tape using a template Use flexible masking tape fur curved panel lines. This will be necessary on the vertical fuselage lines. Although they are straight, the surface is generally curved enough to require flex tape.
Step 3: Engraving the panel lines
Place the tip of the engraving blade at the starting point of the line. Slowly and gently, pull it along the tape up to the end point in one go. Always pull the blade towards you, never push it. Do not apply too much pressure and do not go too fast, as you risk to slip from the leading tape edge. Work slowly and carefully.

Pulling the blade along the Dymo tape Repeat the process a few times, until you are happy with the depth of the line. Normally, 3-5 strokes should be sufficient. The first stroke is the most sensitive, but it also paves the way for the next strokes, providing additional orientation.
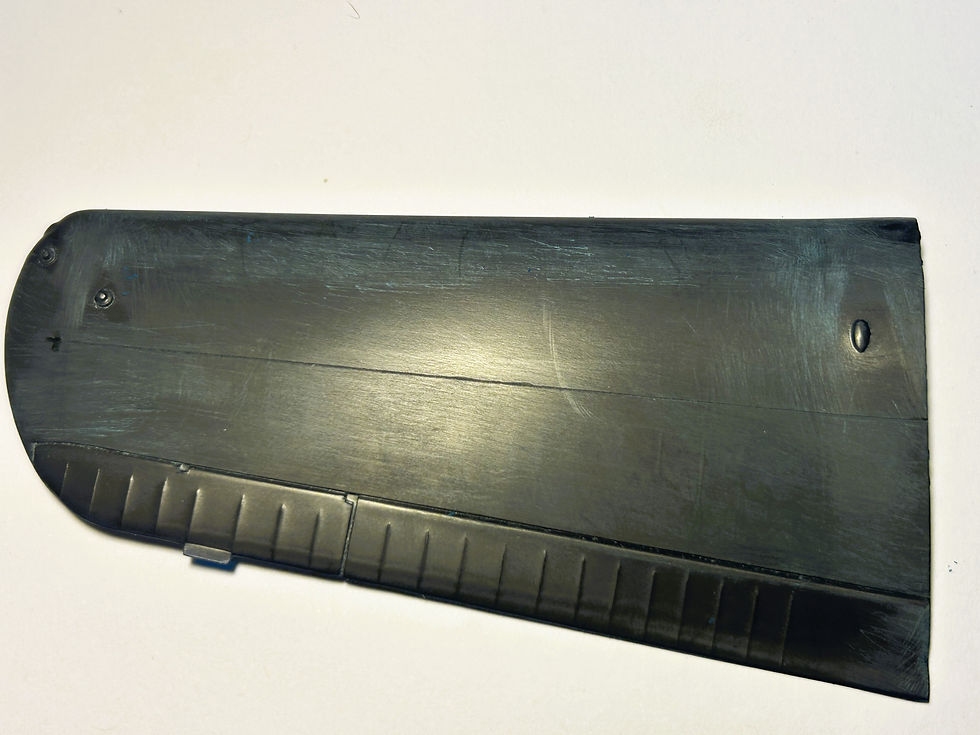
The first line has been engraved Proceed to the next line. Try to remain consistent in pressure and count of the strokes, in order to achieve a uniform result. Also, never work “free hand” on any panel lines, even on small joints.
Step 4: Additional tasks
Engraving hatches: After all lines on the workpiece are engraved, proceed to the hatches. If they have a square shape, you can use the above steps. If they are too small or have rounded shapes, the recommendation is to use PE templates which you can fix with masking tape onto the workpiece.Mark the correct spot upfront and place the template onto the mark. Engrave as described above.
Drill holes: Find the spots that will require holes. Typically, they will be located on cowling covers, opening of hatches, fuel caps, etc. Mark all spots with the marking pen and double check for correct alignment.Then, use a drill with an appropriate diameter to drill the hole. A few rotations between your fingers will suffice. Again, keep consistent with the number of rotations.
Make rivets: Mark the spots that will receive rivets as described in step 2. They will often be located next to a panel line, which you can thus use as an alignment point. Make sure to cover the areas beyond the start and end points with masking tapes. The riveter will usually feature a rotating end. It is important to place the wheel before the start point and to run the stroke beyond the end point (hence the masking tape, which will avoid rivets outside the area to be riveted). Run the wheel only ONCE over the area. Work slowly and carefully, but apply increased and even pressure.
Step 5: Closing tasks
After all holes, rivets and panel lines are applied on the workpiece, clean all residue and excess that may be stuck in the lines or holes. Wash the part with warm water and some dish soap.
Apply final sanding with fine sanding paper (800 or 1000) in order to smoothen the surface. Wash again.
Optionally, you can apply a light coat of primer and run panel liner into the holes and lines in order to double check your work. This will make visible any flaws, errors, misalignments, etc. Now is the best time for error fixing.
Some hints
When you have finished a workpiece, you can use it to align the transitional lines on its counterpart, e.g. between fuselages halves or on the main wing’s leading edges between top and bottom wing parts.
To avoid misalignments on mirrored lines (e.g. main horizontal panel lines on both wings), you can apply a piece of masking tape on a finished wing between 2 lines (or between a wing edge and a line), mark the two spots with the fine marker on the tape, then place the tape onto the corresponding spot of the counterpart (e.g. the unfinished wing). This will indicate the correct spacing or starting point of the panel line. Just be careful to do this between 2 spots only, in order to counter the mirror image effect.
Start with the long, main and straight lines. Work your way from the longest to the shortest lines, but try to work by block stages or logical clusters. In any case, keep the small hatches, holes and rivets for the end.
When using templates on wings, begin with the horizontal lines and start from the trailing edge. The flatter surface will better receive the template.
Generally, use all points of orientation that the surface provides you with. These can be edges of the flaps, wing fold lines, landing light inserts, cockpit openings, etc.
Was this post was any helpul to you? I would be happy if you leave a comment or drop me a mail!
Comments